Wednesday, April 25, 2012

AloooooHA!

We're gettin' bright and cheery and Hawaiian up in here.  Today's project is brought to you by sheer boredom and time spent browsing the aisles of Big Lots.  It's amazing where inspiration can strike!

Ingredients:
-Two 48 count boxes of drink umbrellas
-One medium round styrofoam wreath
-scissors


All I did was open up all the umbrellas and started sticking them into the styrofoam, arranging them as I went.


The sticks protruded through the back and I debated cutting them first, but was afraid they wouldn't poke through the styrofoam as well.
I kept adding more and more umbrellas, making sure the sides of the wreath were covered too, so you couldn't see the foam.
Some stayed open more than others, and that was okay, because it made for more dimension and helped them fit together easier.

Once completely covered, I had the issue of the protruding sticks.  If I left them that long, it wouldn't rest against the door very well.

So I took a pair of scissors and snipped off as close to the foam as I could get....just enough to cut off the sharp point.


And that's it!  A bright and colorful wreath for our back door.  Makes me want to hit the beach....or maybe a pitcher of margaritas!!

Wednesday, April 18, 2012

Dining Delight

I am happy and proud and excited to annouce.......that I have finished the ten dining room chairs I had been working on for a client!!!!! Yes, TEN chairs.  It was a big undertaking that spanned over several weeks, two chairs at a time.

Eight of the ten chairs were seats only.  Pretty simple, but still required time.  The two head chairs were fully upholstered, legs and everything.  They required a lot more work and time....and patience!

Here is what the eight side chairs looked like before:
And after:

It was very simple, very elegant gray/silver fabric.  There was a slight stripe to it and when the light hits it, you can see a faint silver fleck.  Very classic.  A far cry from the floral pattern originally on them.

Side note:  does our grass appear to be super green in these shots??  No camera effects either.  Just the beautiful brilliance of springtime :)


The head chairs, or Parsons chairs as they are officially called, were completely upholstered.  There was way more to it than removing the existing seat fabric and slapping a new piece on.  Most of the time I alotted for each chair was due to removing the existing fabric.  Staple by staple.  It was a nightmare.  But the actual upholstering of the chairs was fun!

Parsons chairs before:

When I first met with the client to consider fabric choices, she had her heart set on a very beautiful, but very expensive patterned fabric.  My suggestion??  Cover the two head chairs in the patterned fabric, and use a less expensive and simpler fabric for the other eight chairs.  This not only gave her the material she loved, but it helped her budget and allowed the patterned fabric to really stand out against the other chairs in the room.

See what I mean??


I'm really proud of these guys, as I'm sure you can imagine why....they were alotta work!!

The fancy pleating:
The fully upholstered back:

I was a proud upholsterer today :)


It's not often that I get to photograph my work in its new home - it's usually in the dark dirty basement or out in the driveway where I do most of my work.  But I was really excited to take a ton of shots inside her house, especially since I helped her pick out all the paint colors during our color consultation and my company had just finished a complete flooring remodel for her.

In fact, on another quick note, I helped her design the new kitchen backsplash as well:


Can you believe those cabinets used to be oak??? Oh, the power of paint and glaze.  She had herself one hell of a painter, that's all I can say!

Well, that bout sums it up.  Ten chairs later, she has a brand new formal dining room.  And, because there was leftover fabric, we are in the process of discussing a table runner or placemats to finish it off.  Fun, fun!

Tuesday, April 17, 2012

OH - IO!!

Born and raised in Northeast Ohio, I will forever have a special place in my heart for where I grew up.  Not that I've moved far from the tiny town I called home for 23 years; I'm a big city girl now though. ;)

Another project I threw together last week was a piece of string art I had seen floating around the internet lately.  Etsy is full of them, asking at least $65 a pop.  While I can understand the reality of charging for a unique piece of art, I can make it for way less!

Just a few supplies, cost came in at less than $2.  Yep, 2 smackaroos!

Here's whatcha need:
-rubber mallet/small hammer
-wooden board
-large outline of the state of your choice
-small nails
-string

That's it.  Nothing extensive.  In fact, I used a hardwood floor sample I pilfered from work's dumpster (it was discontinued, I'm not gonna lose my job or anything) so I didn't even need to buy that.  I just printed the OHIO shape out from Google images and bought a small box of white nails (make sure they have heads on them so the string doesn't slide right off).


Tape the state to the wood board and outline it with a row of nails.  Get them as close together as you can because it will make the overall image look better.  Remove the state and make a heart shape in the city of your choice with the nails.

Now, I skipped a couple of steps - just the part where I go around and around and around the nails with white sewing string.  Basically, you start at one nail and tie it off, then wrap the string from the outside nail to a nail in the heart and back again.  Granted, you will have more wraps on the heart than you will on the outline because of the amount of nails.
See what I mean?  Kinda heavy on the string in the middle as opposed to the outside edges.   I suppose if I lived in central Ohio, it might have been easier, but oh well.

Next step, find a studly man to cut the board down to size.  I understand it would have been easier to do this prior to the nails and string, but my studly man was at work when I started and I'm impatient.

Excellent product placement with the Craftsman toolbox in the picture.  Craftsman Execs, if you're reading this, we need to talk.

Because I forced his engineering head to cut without measuring (he notably scoffed at the concept), the cuts were slightly out of square.  Easy fix.
We had some wood shims lying around that were just the ticket. I cut them down to size on the band saw and attached them with hot glue to the outer edges of the wood board.


They were knotted and rustic enough to be a great contrast with the dark brown wood.  Plus, they hid the crooked cut - way to drop the ball on that one, Dan! ;)


Ain't it great?!  Looks even better sittin' atop my Ohio brick.  Not that it's staying outside by the tree, but for photo-taking purposes, it serves it well.  Dan has since requested a New York one, complete with Long Island.  Now that is a challenge!

Monday, April 16, 2012

Mirror, Mirror

The Stanley Cup Playoffs are currently going on right now.  What does that mean for our house?  It means that, although hockey has been on since October, it is now playing 30 games a night in our living room.  I can't complain too much (but I do anyway!) because there really isn't anything on television these days.  So while Dan watches the games, what do I do?  I craft in the living room.

My latest project was just something to keep me busy without any preplanning.  I actually came up with it on a whim.

I had this mirror stashed in the closet for awhile, not really having a spot for it.  It was $3 at a garage sale a couple summers ago.
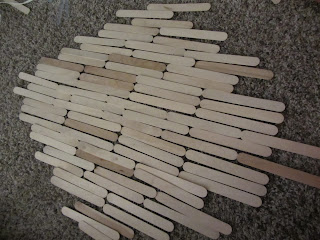
I also had a huge 500 piece box of popsicle sticks left over from my snowflake project this past winter.  What exactly do you do with 500 popsicle sticks??

Well,

I played around with a few ideas.  At one point I just got carried away and started covering the carpet.
What can I say?...Hockey can bore me.

But I settled on the second layout, kind of like a hardwood floor.  I debated painting the sticks, but I liked the natural look with both the light and dark colored wood.


Nothin' fancy, nothin' special, just something to kill time and keep me busy.  Thinkin' about hanging it in the stairwell that I just updated in the previous post.

Keep checking back for more small craft projects....hockey goes until June!!

Stairway to Heaven...or at least the second floor!

I finally tackled something that spontaneously popped up on my to-do list in January.  I hadn't given it much thought and just threw it on there as a one-day-i-might-get-to-this kind of project.  It's amazing what happens when you Pinterest for an hour (yes, I just turned Pinterest into a verb, much like Google e.g. I was googling the other day...).  Inspired by what I was seeing in the Home Decor section, I decided to hit up Home Depot on my way home and strike while the proverbial creative iron was hot!  Of course, there were zillion other things I should have been doing, but I'll get to that another day.


Allow me to introduce you to my ho-hum staircase leading to the second-floor master bedroom.  The original hardwood (at least I assume it's original to the 1939 house) also extends throughout the entire bedroom, but let's just focus on the stairs for right now.  It's scuffed and scratched everywhere which, honestly, kind of adds to its charm in my opinion.  So this makeover wasn't necessarily about covering up ugly, it was mainly about brightening up the small area.  I took to the stair risers for this one.

I'm also exposing you to my dust.  Just remember, if we focused a camera on your steps, they would probably be dirty up close, too! 


And here is another step-by-step tutorial on how I took paintable wallpaper from Home Depot and used it on my staircase.
The whole process only took me a little over 2 hours - 15 minutes of that time was me lying flat on my back in the living room because there is a lot of hunching and scrunching and crouching involved in this project and my back killed by the end. So DIYer beware. But all-in-all, it was actually really easy.
 
Materials:
-Paintable vinyl wallpaper - 1 roll=25 sq yds for $12.97
-Hot glue gun
-cutting mat
-rotary cutter
-tape measure
-metal yard stick or straight edge
-Sharpie or pen

I didn't want to do anything permanent to the steps, like adhering the wallpaper the way it's supposed to be adhered (it was prepasted, so you could do that if you wanted).  I was looking for a quick, easy, cheap fix and decided to use hot glue - the almighty answer to everything!  This way, if I want to remove it or change it later, it will peel off easier.  Will this last for a long time?  Probably not.  It will also make cleaning the steps with the Swiffer a little more time-consuming, being careful not to get too much cleaner on the paper itself.  But it is paintable wallpaper and relatively durable, according to the instructions on the package.  So I gave it a go.  
A few tips:


-Measure twice, cut once. Only had to make that mistake once.

-Measure each step individually. Don't just assume each step is the same, especially in an older home. My shortest step was 6 1/4" high and the tallest was 7 3/4" high. They all visually appear the same, but weren't.

-Don't make your pieces too large, or it will be hard to get them to lay smooth. It won't be noticeable if you come in 1/8" here and there to make sure it fits.

-Start with a few blobs of glue in the middle of the top edge directly under the stair nose. Work out from there along the top edge, smoothing and straightening until you hit the wall on either side. Then start at the middle on the bottom and work out. This helps smooth the paper as best as possible and prevent an air bubble right in the middle.

-Try and find a happy medium between too big of a blob and too small of a blob of glue. (again, these instructions will not work if you are actually wetting the paper and attaching it the correct way)

-You really only get one shot at sticking the paper up. It's removable with hot glue, but it will leave a hole in the paper and you'll need to re-cut that piece. Don't hesitate to do so if you're crooked or something, but just have fair warning
 
Even after just the first 3 stairs, I already noticed an improvement.  Granted, it was dark outside and I was working by the light of our very dim overhead fan, but the 3 stairs brightened up the area immediately.  I think it makes a huge difference!


After

Before