It's no secret I love me some wine. In fact, this past Christmas I received two bottles of wine, two hand-painted wine glasses, a wine bottle caddy, wine glass charms, and an Eiffel Tower wine rack....notice a trend??
So it seemed only natural that I create a one-of-a-kind wine bar.
And I made it out of the most random of objects.
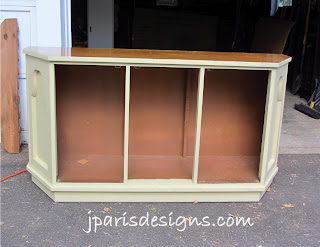
See, I had this large credenza that I got from a client's home (the same client that gave me the radio cabinet I turned into an entertainment stand).
So I sat around staring at both of them for awhile, unsure of what I wanted to do with them. Then genius struck and I came up with this.
And that was as far as I got.
But the longer I stared, the more ideas formed in my head....you see where I'm going?
The overall process took a loooong time. Like, a really really loooooong time. But I managed to snap a few pictures here and there as the design took shape.
I started by painting it with a can of Oops paint from Home Depot. This was the base coat.
The second coat was an experiment I read about online. Chalk paint is all the rage lately on the DIY circuit. When I looked into purchasing some of it, it rang in at around $30-35 a quart!
Woah.
I'm too cheap for that just yet. So I made my own using Plaster of Paris and enamel latex paint. Mix two parts paint with one part plaster and you get the consistency of chalk paint. It also helps it sand easier when distressing.
A closeup of the distressing I did to the whole piece. It helps it look worn and rustic and gives it a lot of character.
I used our new drill press and hole saws to cut holes in a piece of plywood for the wine bottles in the front.
I used carpet tubes as the wine bottle holders. There's actually a whole infrastructure inside there that consists of furring strips, nails, glue and braces. No pictures of that though....it remains a trade secret.
Now let's talk about those corks. Ohhhhhh boy, those corks. All 350 corks cut lengthwise on the bandsaw making 700 halves that were then hot glued like a puzzle to the top of the bar.
Did you know you can buy 500 corks on Ebay? Neither did I. But now I have A LOT of corks left over (and a zillion projects in mind for them!).
The side doors open up for extra storage, but the center console remains closed off for the wine bottles.
That black piece of hardware holding up the shelf is actually a stair railing brace from Home Depot - they caught my eye in the store and were small enough to work.
Speaking of the shelf, I made that by hand out of cedar planks we had.
Each wedge was cut on the bandsaw and nailed to the top piece. I polyurethaned the whole thing and am really happy with how rich the color came out. Cedar is a beautiful wood.After all of this, though, I am sad to say I have absolutely zero room for this awesome piece in our small and overflowing house. Therefore, it is officially for sale to whomever can give it a lovely home. If interested, please feel free to contact me via email at jessica@jparisdesigns.com. Update: SOLD!!
And let's just look at it one more time, shall we??
I'm so happy with it :)


I've got to say -- this one came out fantastic! The wine cork top is really cool. Looks like one of those 1000 piece puzzles....
ReplyDeleteDAN
Thanks :)
DeleteAwesome work! It looks like there is just enough room to put a wine fridge/cooler in one of the cabinets.
ReplyDeleteJB
HA! I never thought of a wine fridge! I bet you're right too....just enough room on either side. That can be a new selling point. Thanks!
DeleteI love it Jess!!! I don't think I have enough room to put it at the house :(
ReplyDeleteAmanda n Mike
You can find room!!
DeleteLove it!!!You are soooo creative just like your Grandpa
ReplyDeleteThe ultimate compliment :)He was a talent we don't see every day!
DeleteWow. That's cool. Nice work. - Bob Welch
ReplyDeleteThank you!
DeleteThat is beautiful Jess, love it!
ReplyDeleteThanks!
DeleteWow! This is totally unique! I love the corks, I'm sure that took forEVER. Great job Jess!
ReplyDelete