Right on, Mima!
So what did I do? I trucked them all the way home from Rochester, NY and promptly put them in the basement to collect dust and forgot about them. Fast forward to July 2012. While searching through the basement for a "quick" project idea to pass the time, I spotted the chairs. Oh boy, how embarassing! They kept getting pushed to the back of the pile. Knowing we would be in Rochester the following weekend for a wedding, I decided to give 'em a go.
Here's #1:
Simplistic, easy, nothing a little bit of paint wouldn't cheer up. But once I unearthed it from the dungeon of furniture, I noticed a slight problem....
There was a big 'ol crack right down the middle of the seat.
Bummer!
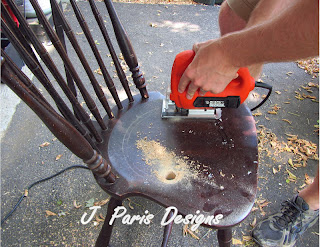
Determined not to let that stop me from finishing it, I set out on another path. My mom used to have an old wooden chair in her garden with a hole cut in it for a potted plant. Kind of country-esque, chappy chic-y I suppose. Without getting too technical (because it's pretty self explanatory), I will try to categorize some pictures of the process.
 |
| Started by marking out a hole that would allow the plastic pot to sit inside. |
 |
| Drilled two holes on either side of the chair to insert the jigsaw |
 |
| Holes drilled for inserting the jigsaw |
 |
| Using the jigsaw to cut out the circle |
 |
| Inserting the plastic pot to make sure it fits |
See, pretty easy to follow along? And yes, I did employ the help of Dan the Man - it's his grandma after all! One tip though: we made sure that the circle fit the base of the pot, but that the lip of the pot didn't slip through.
Just a quick coat of paint and it was good to go! I chose lime green because her front door is bright green and I thought it would compliment it well. :)
Here's #2:
I envisioned it to go in her kitchen which is decked out in black and red (she has a red sink, for goodness sake. How cool is that??). I decided to do something fun with the seat of this one. The chair itself was already full of chippy goodness, so I kept right along with that.
 |
| I was able to use up some Behr samples in the basement from painting the kitchen! |
 |
| I rough brushed the red on, letting the old color show through |
 |
| Using painters tape, I made a grid and painted the black coat on |
 |
| Once dry, I removed the tape and Voila! |
 |
Here ya go, Mima.....better late than never??


No comments:
Post a Comment
Hi there. Thanks for leaving some feedback on all of my hard work! I love hearing from everyone - friends and strangers alike. :)