Tuesday, March 12, 2013

*UPDATE* and where you can find me now!

It's been months.  It's been months and months and MONTHS!  But that's only because I've created some pretty awesome things during that time!

I opened my shop and packed it full of really awesome redesigned furniture and home accessories.  And business has been booming ever since!

I created a new website (by myself) and I've been blogging there pretty regularly about projects I do for the shop.  If you've been a fan of this blog, head on over to/http://www.jparisdesigns.com/category/blog/ to check it out!

I will no longer be writing posts for this particular blog.  But no worries....I won't be deleting it either!  It's as much a source of inspiration for me as it is for you.  I often read through the posts and look over the photos and remind myself how far I've come.  Plus, it serves as a diary of sorts - a catalog of all of my favorite projects from the past.

So be sure to check in on my NEW Blog and Website and be sure to say HI.  I'd love to hear from those of you that have been following me all along!  I'm still a tiny dot on the map of the internet/blogging world, but a few familiar faces make it seem like I've reached people :)

So, Thanks!  To anyone who has read this blog, whether it is one post or every post.  It means the world!


--
Jessica Paris
Owner/Designer

J. Paris Designs
1835 4th St.
Cuyahoga Falls, OH
Like us on Facebook!!

Saturday, September 22, 2012

Things, They Be a-Changin' - Part 2

I left you yesterday with the cliffhanger of Big Changes Are Coming...dun dun duuuuuun! Any guesses as to what those changes are? I'll give you a hint...I've ordered new business cards with an address on them :)


I am now the official owner of J. Paris Designs - Redesigned Home Furnishings and Accessories. My store will open some time in mid November, just in time for the holidays.


How did I come to this point? Well you remember I said I had a bad day at work one day? Seriously, that's all it took. Of course, I hadn't been happy for awhile. I would sit at work all day and just think about all the stuff I would rather be doing. I'm sure most people think like that at their 9-5, but mine was deeper than that. I really felt like I had a talent that was marketable. I felt like it was being squandered as a "hobby" rather than a "profession". I needed to do something with it, if for nothing more than my own sanity.


This is where my amazing and supportive husband comes in to play. As soon as the words "Let's really think about you doing J. Paris Designs full time" were uttered, that was all I needed. From that point on, I was setting my sights on a new business venture - being a true entrepreneur.


We crunched the numbers and tried to figure out if we could make it on one salary, assuming the worst - that J. Paris Designs wouldn't make a dime for 6 months. Would we be able to make it? The answer was yes, but lots of lifestyle changes needed to be made. It's a comfortable life that we've made for ourselves, and all of that would need to change.


I went through severe highs and severe lows those first few preliminary weeks. Some days I would think "Hell yes, I can do this!" Other days I would think "What if no one buys anything? What if I fail? What if..............?" I couldn't get over the fact that I was upending our entire life for a dream I was dreaming on a wish and a prayer. Quite honestly, I had no idea if this was going to work. I didn't (and still don't) have a business plan, I didn't have a projected budget, I was just flying by the seat of my pants. The good thing is, no one around here is doing what I'm doing - at least not with a store front. I used that as a comforting thought. I always received such great feedback from my readers about the things I had created, I felt confident that others would feel the same. I can't count the amount of times I've heard "Where do you come up with this stuff?" or "I wish I had that kind of imagination". Those kinds of comments are what fueled the fire of me thinking that others would appreciate the talent that I have. I say that as humbly as possible because I'm still trying to gain confidence in my work as an artist and designer.


There were days when I was ready to scrap the whole idea and just look for another job that would be a change of pace for me. But Dan's ever constant support and confidence in me is truly what kept me from throwing in the towel. "Every piece you do gets better and better" he would say. When he would brag about me to friends and family, he made my heart swell with confidence. He believed in me, and therefore I had to believe in myself. We are a team and we are in this together.


I knew I wanted a storefront close to home, so we searched in the surrounding retail areas for "For Rent" signs. Most of the numbers I called were for places waaaaay out of our price range. I got discouraged, and of course started being Negative Nancy, assuming we would never be able to afford anything! One day, a sign caught my eye in front of a shabby looking brick building about four blocks from our house. It wasn't in a prime retail development or strip plaza, but it was close. I called on it and met the man a few days later. The place was in our price range, the landlord was incredibly nice, it was super close to home, it. was. small. Small, small. Like, big enough for a table and a few chairs small. When he showed us the inside, I was devastated. In my head, in just a few short days from the time I saw the sign, I had already moved my stuff in. We thanked him and started to leave when he mentioned the spot next door. It wasn't technically for rent, but I asked if we could just see it. The moment we walked in the door, I knew this was it. Dan, not so much. He couldn't see what I could see. The place had been vacant of a business for over ten years. It had been used as the man's storage area and was packed FULL of stuff. It needed a lot of work. But I didn't care, I wanted it.


From that point forward, I've gone full speed ahead. I finally had the green light to obtain and stash as much furniture as possible so as to have an inventory. It didn't take long for me to fill the garage then move into the basement, back porch, office, and spare bedroom. My sickness finally had an excuse to run rampant!! I began scouring the internet and magazines for project ideas and inspiration. During the day, my head would be reeling from the ideas running through it. At night I would work until it was dark outside in the garage. Every spare moment has been dedicated to getting everything ready. I lost sleep - and fully expect to lose much more in the coming months - due to tossing and turning and worrying and stressing. I've really been a mess. But I'm making it work.


When I told my dad (who used to own his own plumbing business) he said "Jess, I did it with a wife and two kids! All you can do is give it a go. What's the worst that can happen? You have to go out and get another job?" That really gave me confidence. He was right. I still had my degree no matter what. I could always find something else if this didn't work out.


Until now, only our parents and siblings new about the plan. I was very cautious who I told and what I told them. This wasn't something I wanted to blurt out to the world when I was still worried that it was just a fabrication in my head! But it is real....real scary. It is by far the most exhilarating/frustrating/terrifying/exciting thing I have ever done. I'm going to be my own boss :)


I don't know where this will go, I don't know how long it will survive, I don't even know if I'm doing it right. But making mistakes means I'm doing SOMETHING and that is all I can ask. My mantra has been "Your dream job doesn't exist, you have to create it" and I've repeated that to myself time and time again. I'm creating it, just like I create everything else.


Besides, if I don't do it now, when will I do it?


So thank you to everyone for reading this blog and commenting on my projects and supporting me in any way. This is a HUGE adventure I'm starting and I truly appreciate everything you've done to help me on my way :)  And if you have any free advice, I would be more than willing to hear it!!     NOTE: I'm no computer tech by any means, but I'm attempting to create my own website in the next few weeks.  That being said, I'm not sure how well the transition will be from Blogger to Wordpress.  I won't be writing any new posts until the switch, but be sure to follow along on Facebook/jparisdesigns!!  

Thursday, September 20, 2012

Things, They Be a-Changin' - Part 1

I don't know about you, but whenever I find a new DIY website or blog, the first place I look is the About Me section.  I love reading about people's background stories - how they came to be where they are.  Especially if they started out doing something completely different.  In the spirit of that thinking, I would like to share with you my story:


Making things has always been my hobby.  I'm the little girl who used her mom's old-school sewing machine to make Christmas presents and stuffed animals as far back as I can remember.  I get it from my mom, who is the Crafting Queen.  Christmas ornaments, Holiday outfits, doll clothes...You name it, she made it.  

In junior high I "started a business" for handmade clothes (I was going to be the next great fashion designer).  I busted out my magic markers and poster board and made a flyer with sizes and prices and showed it to all my friends at school.  I gave the business a name and everything, though I'll be damned if I can remember what it was!  I even wore some of the clothes I made as examples of my work.  Now, you must know, I didn't use a pattern and one of the skirts I made was bright satin orange material from the bottom of my mom's fabric pile.  But MAN - I rocked it!  Then right after high school, I started another "business" selling things made out of duck tape.  It was right when all the bright colors were really popular and I bought rolls and rolls and rolls of the stuff (I also used every last bit of the real deal from my dad's garage stash).  I made purses and lunchboxes and tote bags and wallets and roses and pins and....well you get the picture.  I sold them at craft shows and to friends at work.  It was fun, and I made some extra spending money.  It was called "RiDUCKulous" - I'm so clever - and again, I made a big sign that hung on the table at the shows.  I was a young entrepreneur and I was going to make it big one day!

Eventually, I got on this furniture kick.  Picking up roadside finds.  Visiting thrift stores.  Making cool stuff out of junk.  I still remember my first roadside dresser - boy was that a rush!  My senior year of college I even did an Independent Study elective on fixing up furniture and documented the steps.  

When I moved out of my parents' house and into my own apartment, I had accumulated enough furniture that I didn't need to buy anything but a sofa to outfit my new place.  Everything in the small apartment was something I had handcrafted in one way or another.  Once out on my own, I began to move my furniture collection into Dan's house.  The basement primarily, but that quickly spread into the garage and other rooms.  By the time we moved in together six months before our wedding, I had enough pieces to furnish the entire house.  We actually had to have a garage sale to get rid of the stuff we didn't have room for.  That was a year and a half ago and since then,  it's only gotten worse.  

Hi, my name is Jessica, and I am addicted to furniture.

I openly admit it.  I have a problem.  I CANNOT pass up a good/free deal.  It is in my blood and a definite passion.  I can't remember the last day off I had that didn't consist of me working on one project or another.  Or if there were other things I needed to do or places I needed to go, I would constantly be thinking about a project I had waiting for me.  I would happily spend my free time working on fixing something up.  Eight hours would literally fly by with me wishing I had another eight.  And when I would come home with "just one more chair", Dan would give me that look, shake his head, and stuff it into the basement.  He has no patience for slow drivers, tangled Christmas lights, or a knotted rope, but my goodness he is patient with me.  It's why I married him.  He doesn't get it, but he gets it...ya know what I mean??

It got to a point where family and friends would call me with a "I found something by the road, do you want it?" statement and I would always say yes.  That's how I got one of the chairs in our living room.

I always toyed with the idea of owning a shop one day that consisted of all the things that I made.  I thought it would be fun, but knew that it was probably a far off dream.  So I had gone to college, got the degree, got the "Dream Job" as an interior designer and settled in to a life of routine.  Now, I'm not about to bite the hand that fed me for a year and a half by bashing my job, but it wasn't what I wanted.  At first, yes.  But after a while, it just wasn't challenging me.  And if I'm being honest, I wasn't very good at it.  At least the sales part of it.  I could help people pick out colors and design their kitchen back-splashes all day long, but I just wasn't meant to sell flooring as a profession.  I got bored.  I needed something to do or make or create....what I was really passionate about.  Again, that starting-my-own-business thing was always in the back of my mind, but I always cast it off as a pipe dream. 

And then one day, I snapped.  Pressure at work had built up, my anger finally surfaced, and I cried all the way home.  The particulars aren't important, but what matters is that it was the catalyst I needed to make some changes.

That was about two months ago and since then, some big changes have taken place.  I'll leave you with that, since reading an incredibly long personal story all at once can get boring.  And I don't want you to leave and never come back.  I'll share the rest with you tomorrow, so make sure to check back to see where these changes are taking me. :)

Monday, August 20, 2012

Chair Change-Up

Just a quick little before and after of a summer garage sale find.  Using the same brown paint as I used on the wine bar and a reupholstery job on the seat, front, and back, it was good to go! No "in progress" photos this time, But trust me, it is not without pictures!  I've been trying to take better and better ones with each passing project.  Different angles, different camera settings.  I'm still not on board with editing each one like some bloggers do.  For starters, I don't have Photoshop, but also because it takes a long time.

Anyways, I hope you enjoy the pictures! :)

P.S.  This one is for sale as well - contact me if you're interested!


Sunday, August 12, 2012

Wine-OH!

I would like to introduce you to my new pride and joy.  I've spent long laborious hours working on this particular piece, and I couldn't be more happy with the way it turned out.  And I'm so excited about it, I've decided to show you the After picture first....

It's no secret I love me some wine.  In fact, this past Christmas I received two bottles of wine, two hand-painted wine glasses, a wine bottle caddy, wine glass charms, and an Eiffel Tower wine rack....notice a trend?? 

So it seemed only natural that I create a one-of-a-kind wine bar.

And I made it out of the most random of objects.
See, I had this large credenza that I got from a client's home (the same client that gave me the radio cabinet I turned into an entertainment stand). 

And I had this twin size headboard I stole took from the neighbor's trash pile.

So I sat around staring at both of them for awhile, unsure of what I wanted to do with them.  Then genius struck and I came up with this.

And that was as far as I got.

But the longer I stared, the more ideas formed in my head....you see where I'm going?

The overall process took a loooong time.  Like, a really really loooooong time.  But I managed to snap a few pictures here and there as the design took shape.
I started by painting it with a can of Oops paint from Home Depot.  This was the base coat.
The second coat was an experiment I read about online.  Chalk paint is all the rage lately on the DIY circuit.  When I looked into purchasing some of it, it rang in at around $30-35 a quart!

Woah.

I'm too cheap for that just yet.  So I made my own using Plaster of Paris and enamel latex paint.  Mix two parts paint with one part plaster and you get the consistency of chalk paint.  It also helps it sand easier when distressing.

A closeup of the distressing I did to the whole piece.  It helps it look worn and rustic and gives it a lot of character.

Just a quick look at my stab at stenciling.  I had attached a sheet of burlap to the headboard, just to give it texture and an "old world" feel.  I printed out wine words on the computer, used carbon copy paper for tracing, and then colored them in with a brown Sharpie.
I used our new drill press and hole saws to cut holes in a piece of plywood for the wine bottles in the front.

I used carpet tubes as the wine bottle holders.  There's actually a whole infrastructure inside there that consists of furring strips, nails, glue and braces.  No pictures of that though....it remains a trade secret.

Now let's talk about those corks.  Ohhhhhh boy, those corks.  All 350 corks cut lengthwise on the bandsaw making 700 halves that were then hot glued like a puzzle to the top of the bar.

Did you know you can buy 500 corks on Ebay?  Neither did I.  But now I have A LOT of corks left over (and a zillion projects in mind for them!).


The side doors open up for extra storage, but the center console remains closed off for the wine bottles.
That black piece of hardware holding up the shelf is actually a stair railing brace from Home Depot - they caught my eye in the store and were small enough to work.

Speaking of the shelf, I made that by hand out of cedar planks we had.
Each wedge was cut on the bandsaw and nailed to the top piece.  I polyurethaned the whole thing and am really happy with how rich the color came out.  Cedar is a beautiful wood.

 After all of this, though, I am sad to say I have absolutely zero room for this awesome piece in our small and overflowing house.  Therefore, it is officially for sale to whomever can give it a lovely home.  If interested, please feel free to contact me via email at jessica@jparisdesigns.com.   Update: SOLD!!

And let's just look at it one more time, shall we??

I'm so happy with it :)

Wednesday, July 25, 2012

Chair Combo

I'm sure you've heard the saying "Fashionably late"?  Well that's what this post is about....being fashionably late at getting a job done.  Like, two years lateDan's grandma commissioned me back in 2010 (before we were even engaged) to redo two chairs of hers she had picked up at garage sales over the years.  She didn't care what I did to them or what they looked like, she just wanted me to "do whatever it is I do to them". 

Right on, Mima!

So what did I do?  I trucked them all the way home from Rochester, NY and promptly put them in the basement to collect dust and forgot about them.  Fast forward to July 2012.  While searching through the basement for a "quick" project idea to pass the time, I spotted the chairs.  Oh boy, how embarassing!  They kept getting pushed to the back of the pile.  Knowing we would be in Rochester the following weekend for a wedding, I decided to give 'em a go.

Here's #1:
Simplistic, easy, nothing a little bit of paint wouldn't cheer up.  But once I unearthed it from the dungeon of furniture, I noticed a slight problem....
There was a big 'ol crack right down the middle of the seat.

Bummer!

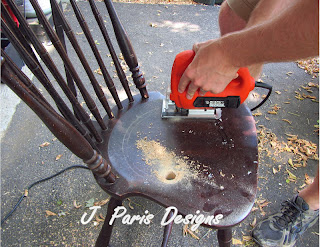
Determined not to let that stop me from finishing it, I set out on another path.  My mom used to have an old wooden chair in her garden with a hole cut in it for a potted plant.  Kind of country-esque, chappy chic-y I suppose.  Without getting too technical (because it's pretty self explanatory), I will try to categorize some pictures of the process.

Started by marking out a hole that would allow the plastic pot to sit inside.

Drilled two holes on either side of the chair to insert the jigsaw
Holes drilled for inserting the jigsaw
Using the jigsaw to cut out the circle

Inserting the plastic pot to make sure it fits

See, pretty easy to follow along?  And yes, I did employ the help of Dan the Man - it's his grandma after all!  One tip though: we made sure that the circle fit the base of the pot, but that the lip of the pot didn't slip through.


Just a quick coat of paint and it was good to go!  I chose lime green because her front door is bright green and I thought it would compliment it well. :)

Here's #2:

I envisioned it to go in her kitchen which is decked out in black and red (she has a red sink, for goodness sake. How cool is that??). I decided to do something fun with the seat of this one.  The chair itself was already full of chippy goodness, so I kept right along with that.


I was able to use up some Behr samples in the basement from painting the kitchen!
I rough brushed the red on, letting the old color show through
Using painters tape, I made a grid and painted the black coat on
Once dry, I removed the tape and Voila!

I love the way the seat turned out!  I also love that the red shows through the black and it looks just as roughed up as before.  My intention wasn't to make it look brand new, rather old and worn and full of life.
Here ya go, Mima.....better late than never?? 


Monday, July 23, 2012

Heavenly Headboard How-To

Well it only took me 8 years to post some pics of the headboard I made for a client.  And yes, I made myself one in the process, but I was too lazy to clean our bedroom to take photos....so you'll have to wait on that one.  I'm also going to try my hand at another How-To tutorial because I searched high and low for one to use to give me ideas on where to start.  There are TONS out there, but none that really show the "best" way in my opinion.

Materials:
-4'x8' sheet of  1/2" MDF board (Home Depot)
-4'x8' sheet of 1" housing insulation (Home Depot)
-Polyfil low-loft quilt batting - 2 twin size packages (Jo-Ann Fabrics)
-Liquid Nails construction adhesive (Home Depot)
-Nail head trim (Jo-Ann Fabrics)

So here is a premise of what to expect.  I wanted to use nailheads as trim around the border of the headboard.  The comforter on the bed had a pinstrip that I wanted to emulate.  The idea behind the shape was to mimick the shape of the dresser-top mirror in the room.  I took measurements of the mirror beforehand and using some mad mathematical skills I was able to keep the proportions appropriate for the headboard.

Drawing the shape on the MDF is pretty self explanatory using a straight edge and a tape measure.  The trick is the second layer.  Allow me to show you....
See the border?  I used a second layer of MDF just along the edge about 4 inches wide.  The purpose?  Well, the nailheads need something to be nailed into.  If I ran the foam all the way to the edge, the nails wouldn't hold.  Make sense?

I chose foam housing insulation because it is cheap and lightweight.  A lot of tutorials I found said to use high density foam padding from the craft store.   Even on a good day, Jo-Ann's sells it for around $20-$30 a yard.  That. Is. Ridiculous.  I needed something in the center to provide thickness but that wouldn't make it too heavy to hang on the wall.  Housing insulation.
I need to note that there are several different kinds.  I chose one that was pretty firm, considering it might get bumped and would need to resist crushing.  Either way though, I think any of them would work.

So I cut the insulation with a utility knife to fit inside the hollow area.  Using Liquid Nails construction adhesive, I attached it to the MDF.


Now we are ready for the quilt batting.  You don't need alot to make it look padded.  I actually put two layers in the center, but left the edges with just one, again so that the nail head trim would attach correctly.
I chose low-loft because it was slightly less expensive than high or medium and would work just the same.  Using my pneumatic stapler, I wrapped it around and stapled it to the back.
Ok, so the next step involves the fabric, which was pure white ultra suede and terrified me.  I was so afraid that I would get it dirty.  So I took things inside and cleared out the living room to work on the floor where it was clean.  Because it was heavy, oddly shaped, and I was by myself trying to wrangle it around, I went without taking pictures.  But I think you can get the gist.  I laid the fabric out face down, laid the headboard on top face down, and made sure the fabric was pulled tight.  Starting on one side, I shot a few staples right in the middle. Moving to the opposite side, I did the same thing. Once all four sides had a few staples in the middle, I started over again. Just make sure to alternate back and forth so you get a good stretch.


Last and final step is the nailhead trim.  It comes on a roll with coordinating nail heads that get put in every five nails.  No, you don't have to attach each nail individually.  Whoever thought up this stuff was a genius. 
This fabric is what I used for my own headboard - stay tuned for that one!
Make sure to use a rubber mallet, rather than a hammer to make sure the nail heads don't get scratched.  Start at one end and work your way around.  The trim actually bends very easily for curves and corners.

All that's left is hanging it.  Other websites mentioned adding legs to the overall headboard and attach those to the bed frame.  That sounded like a lot of extra and unnecessary work.  I decided instead to hang it on the wall, just like a picture frame.  I used to work at a custom frame shop, so I had all the materials on hand.  But any hardware store will sell a picture framing kit.  I used two D-ring hangers, one on each side 10" down from the top.  Proper picture hooks are designed to hold anywhere from 50 to 100 pounds each, so weight wasn't an issue.  Other than that brief info, you are on your own as far as hanging goes.

Finished product:


Side note:  Notice the stencil on the wall?  I helped my client come up with this idea.  She purchased the stencil online and I suggested she have her painter paint the wall in satin finish and the stencil in high gloss (both of the same paint color).  It turned out awesome!  Perfectly subtle for the decor in the room, but it really pops when the light hits it.

And that's all folks.  I hope this helps anyone out there looking to create your own headboard.  It wasn't complicated and only required a little ingenuity with the house insulation and picture hanging hardware.  Good luck :)