
So the hunt was on to find a dresser. I knew it couldn't be just any old dresser, either. Not like the ones I usually find by the side of the road. This one had to be specific. I searched some local thrift stores and came home with this beauty:


Can you visualize it yet??
With Dan being out of the country for work this past week, I decided to make it a surprise for when he gets home.
I started by sanding the whole thing down to give the paint something to stick to. This is a shot of the top of the dresser after about 10 minutes - it was sooo easy! Sanding is by far my least favorite part of a project and I only wish they all went this well.

After sanding it all down, I applied 2 coats of Rustoleum Sunrise Red oil-based paint. A little messier than latex paint, but it gave it a nice, crisp, shiny finish (the goal was to make it look more like metal than wood).
I debated on the color of the drawers. Red or black??
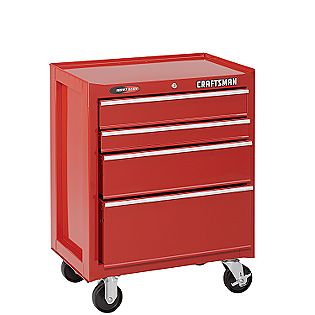

I decided on black because I liked the contrast and didn't want to overdo it with the red.
Finished product:


And because it looked so darn cool, I posed it with some of Dan's antique tools he has in the garage.


There's even going to be a special tool surprise for him inside :)
Total cost was around $75 (remember I spent quite a bit on the dresser itself, but that's because it didn't need ANY modifications!) which is a fraction of the cost of buying a "real" one at the store. Plus, this can hold all the bigger stuff that these chests don't usually fit. Overall, I'd say it's a sweet deal, and a sweet surprise!!
i LOVE it!!! It's amazing how close it looks to the real thing--- you did a phenomenal job :)
ReplyDeleteDAN
you're always my biggest fan :)
DeleteHe's right Jess, it looks like the real thing, nice work! Dad
Deletethanks, Dad!!
Delete