Friday, January 27, 2012

Dan's Man Cave (special guest appearance by Dan The Man)

Taking a time-out from the kitchen remodel, I'd like to focus on another project that's been going on in the Schreiner-Paris house. 

Dan's Man Cave!!

Well, actually, it's a workshop area in the basement.  But because our house is so small, it's the only man-cave space available for him.  And since I have my own workshop in the basement, it was only fair to have His & Her's.

So in true Engineer Fashion, he found a model and tutorial online, drew up an Auto Cad drawing (or 5), and got to work building his workbench.  Technically, we needed a space to put our scroll saw, band saw, drill press, and random tools that don't fit in my half of the basement.  The workbench ends up doubling as a work surface and storage.
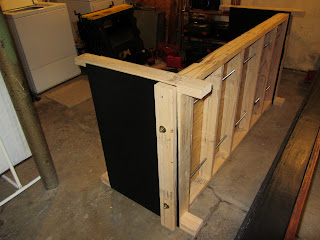

View of the backside with the threaded rods running through.

The back and sides together, just needs the top.


He designed it so that it could be taken apart and carried to the next house.  Held together with screws and threaded rods rather than glue and nails.


Dan posing in his new work space.
His painting scheme was very precise.  The top was stained a reddish-brown.  The sides and back were painted black.  The support beams (2x4's) were left natural wood.  Apparently this scheme was very important and he worried about "how it would look" extensively before it was finished.  I think it looks "Manly".  :)

The gray contraption on the right is the band saw I inherited from my grandfather's workshop.  He was a master carpenter who made beautiful pieces that will be passed down for generations.  Not that I aspire to make as great of pieces as he did, but having his band saw was like having a part of his hobby.  It's really old, but it still works well.

I like to think that a little bit of my resourcefulness and creativity has rubbed off on my left-side-of-the-brain-thinker husband.  Another aspect of this work space that can't be overlooked is the multi-drawer cabinet that Dan fixed up.


Now, he's still a newbie at the fixin-stuff-up thing, so he forgot to take "before" pictures of this.  But it was rusty and old and needed some love.  A good friend of my grandma was having a garage sale this past summer.  Her husband had passed away a few years ago and had a garage full of tools.  She had finally got around to getting rid of some things.  We stopped by the day before and picked through some things that we wanted.  And as sweet as she was, she didn't charge us - she called it our wedding present!  Dan didn't even want the cabinet, saying we had no room for it.  But I convinced him it was worth it.  Little did I know that he would take over the whole redo!

He used my orbital sander to sand down all the surfaces.  He primed the metal and then spray painted them with a hammered metal paint.  He then used shelf liner for inside each of the drawers.

Lookin' pretty good!  Not sure what we will put in ALL those drawers, but I feel pretty positive that we can find stuff ;)

Note from designer:  "I'm not finished yet.  I still need to work up some electrical stuff.  It is already a huge improvement over two sawhorses and a half a sheet of plywood."


Tuesday, January 24, 2012

Kitchen Redoux Part 2

Well, we've struggled onward with our kitchen remodel.  And I mean the literal sense of the word struggled.  In fact, not one thing has gone perfectly since the very beginning.  Go figure with a house from the late 1930s.  But, we've kept our spirits up and have high hopes for our tiny little kitchen.

The funny thing is, when we sat down and calculated our time and money spent, the amount per square foot was astounding (and depressing!!).  But we learned a valuable lesson (the same one learned during the bathroom remodel) - any home improvement project that you tackle yourself will take three times as long and cost twice as much as predicted. 

Let's not forget I had originally planned for this to get knocked out in one weekend.  Oops.

So what have we been doing in the past week and a half??

We (Dan) added an extra outlet in the front of the counter.  Original plan was to put it in the wall, but my dad had the genius idea to put it here instead.  Much easier.  Thanks, Dad.

We made several alterations to our existing cabinets.  Including adding new cross braces and a custom "cut out" in front of the sink (the 1x2 pine board that you see in the front).  Because our cabinets aren't standard depth, our new sink wasn't going to sit correctly in the area.  So we cut out the front and extended it about an inch - it was literally that close.  Now the sink will fit with room to reach under and tighten the screws that hold it in place.

Here's a closer look at the extra piece we added to allow the sink to sit further forward.

We used a sheet of cardboard I had on hand to make a mockup of the countertop, then cut it out of 3/4" plywood.  On top of that went the Hardibacker cement board (being held down with clamps while the Liquid Nails glue dries).  We added an angled part of the countertop in front of the sink to allow for more space and to hide the extension we made underneath.


We used our handy dandy new wet saw.  Fun Fact: to rent a wet saw at Home Depot, it was going to cost $50 a day.  Because we were only doing this a couple hours at night after work, it would either cost a fortune to rent for several days, or we would have had to knock it out in one night.  Better idea:  buy the cheapest wet saw we could find.  Sears had a Craftsman for $99.  We had a $50 Sears gift card and split the other $50 with Dan's dad who was also doing a backsplash.  Total cost ($25) was less than a one day rental and we get to keep it for future projects.  AND, it worked like a charm.

Another Fun Fact:  We used the WET saw in the driveway. At night. In January. In the snow. While we were both sick. Brilliant?  Not all the time.  But we eventually moved it to the basement.


We (I) installed the cut granite tiles onto the countertop with premixed thinset.  Then the next day I grouted them with black grout. 

So where are we now??  Backsplash is up and partially grouted, sink and faucet is installed, but plumbing issues may push that back a day or two.  The cabinet painting won't happen until at least next week.  And I'm still on the hunt for new hinges for the doors.  Plus, we still need a new hood for over the stove. 

Part 3 will come next week when we are finally cooking and cleaning in there again.  Stick around....

Sunday, January 15, 2012

Kitchen Redoux Part 1

Remember my last post about New Year's Resolutions and whatnot??  Well, Numero Uno on the list was to get crackin on the kitchen remodel.  When I say remodel, you must remember that our kitchen is slightly larger than a postage stamp and doesn't give much room for moving things around.  So basically, we just revamped and refreshed stuff using the same layout.

View from the living room doorway


View from adjacent dining room doorway


So there she is.  And no, there is no other countertop space hiding on the other side of the room.  directly across from this area is a small freestanding pantry we bought on Craigslist and the refrigerator.  Those both smoosh together tight in the opening, so no additional counter space is possible.  This is it.  Approximately 6 feet long, including the sink area.  Boo.

Where do I start about all the things that are wrong/bad/gross/ugly??  Well, first, the cabinets are all homemade.  Homemade, meaning they aren't standard size or standard construction.  But they aren't super dated (no scrollwork or 1980's oak here).  We initially priced out new ones from Home Depot which were going to cost $700!!  That's for us to take home unpainted/unstained cabinets and install them ourselves.  Oh, and it's just for the bottom set, not the top!  Yea, I thought it was crazy too.

The major problem though, is that the cabinets are 2 inches shorter in depth than standard cabinets  - our's are 22" deep and standard is 24" deep.  That creates a whole myriad of problems.


See that nasty brown caulk there?  Well, what you are looking at is the spot where the back of the sink meets the back of the laminate countertop up against the wall.  Because the cabinets are so short, the previous owner cut into the back of the countertop to allow for the sink to fit.  Sounds kinda confusing, I know.  But it's an eyesore nonetheless.  Not to mention the ugly dated faux butcher block laminate countertop.

But wait....There's MORE!!

Someone - and I wish I could meet the person who thought this was a good idea - decided to put faux brick as a "backsplash".  Luckily, when Dan moved in, I chose to paint the kitchen red and it hid them somewhat (at least I tell myself that - don't ruin it for me!). 

So first step was to get that crud outta there!  And to our surprise, the counter wasn't even screwed in, just glued.  A few taps underneath with the hammer and off it came. 

Yea, and then we found this....


Gross, I know.  Please don't judge.  Not really sure what happened here, but it put a screeching halt on our countertop plans.  What do you do when you have a gaping hole in the wall??  Plus, our walls aren't drywall, they're lathe and plaster.  My $500 budget just got flushed down the home improvement toilet.

Thanks to the genius of my husband, we figured out a way to rig it so that the hole was covered and the backsplash would hide any imperfections.  Let the next homeowner worry about it! :)

We replaced the missing lathe boards so that it was - somewhat - flush.


Then we covered the "hole" with a sheet of luane cut to size.  A little joint compound and some light sanding and we should be good to go.  The backsplash tile is on mesh, so it should help hide the slight bumps here and there. (Are you noticing a lot of "shoulds" going on??)

Being homemade, of course the cabinets weren't level.  So using my awesome Craftsman Multitool, we shaved down some areas and added shims to level that sucker up.


After all of that - and the fact that the new sink was sitting at my parent's house - we were at a standstill for cutting the countertop.   I pouted for a little bit (I had a strict schedule I was trying to keep) and then we went out to eat.  I think there will be alot of that in the upcoming week.

Here is a sneak peak at what is coming up:

The countertop is going to be black 12x12 granite tiles and the backsplash is a 2x2 slate mosaic.  Pretty :)

Stay tuned as we plow ahead into this remodel and - hopefully - come out unharmed!!

Wednesday, January 4, 2012

Auto Cad Crazy

This spring marks the 4 year mark since I took an Auto Cad course in college.  That is frightening to me for two reasons.  1) I agreed to do a drawing for a client having not looked at Auto Cad in that long, and 2) I've been out of college for almost 4 years (!!).  But I rocked it then and I rocked it now ;)

If you aren't aware, Auto Cad is very, very, (emphasis on the very) very expensive.  Lucky for me, I know a devilishly handsome (and slightly anal) engineer who has it on his work laptop which he graciously brought home for me to use. (Only after I called slightly panicked saying "I promised him a drawing and I don't even own the program!!")

Well, I did it.

And only after just a few expletives escaped my lips.  And a refresher course from Dan the Man.  And a couple palm to face actions.  I am happy to report that my client will be receiving a pamphlet courtesy of J. Paris Designs that will include the plot plan (overall floor plan of the room as seen from "above") and two elevations (the front view of two separate walls) along with a couple photos of different ideas he can incorporate into the design when he takes it to his contractor/cabinet maker man.

I leave you now to bask in the glory of my awesome drawings.  Go ahead....bask away :)

Plot Plan                                                                                                                     


Elevation 1
Elevation 2

Tuesday, January 3, 2012

Resolving to Tackle My Resolutions

I never was one for a New Year Resolution. Other than "trying to excercise" or "eating less junk food" - which barely lasted until the end of January. But this year I plan to actually set one and achieve it.


I have SOOO many unfinished/barely started projects consuming my house/basement/studio/brain that it is borderline ridiculous. Some are relatively small, like trying to fix the broken leg on the coffee table. You'd think I would get on that pretty quick considering every time I put my feet on it it creaks and wobbles, threatening to spill my wine all over the new carpet! Some are bigger, like the kitchen remodel we are currently planning - to be tackled in the next month or so.


And then there are all the other in-betweeners that I will list now - mainly for myself to keep track but also for you to hold me accountable for my procrastination.


1. Revamp the dresser I found by the side of the road a couple weeks ago - seen here
2. Work on the nightstand for Dan's side of the bed that I picked up at a garage sale over the summer. I don't feel like stripping it but the white paint is too stark. Applying a wash of stain over top might just do the trick. Plus it matches mine from this post!
3. Finally get to work on the two wooden chairs Dan's grandmother sent home with me, oooh, a year ago maybe?? Yea, I haven't forgotten, Mima!
4. Fix up the other wicker-backed chair from garbage night that matches this one

5. Paint/attach paper to the stairs leading up to our bedroom. The staircase isn't open or lit very well, so it appears rather dungeon-ness when looking up it from the living room. I used these as inspirations:


6.  Paint the windows in the kitchen.  They are a hideous shade of cream that goes terribly with the otherwise white trim in the room.

   7. Remodel the kitchen!  New countertops, sink, faucet, tiled backsplash, stove hood, and cabinet paint.  

   8. Reorganize my studio - I've been rather sloppy these past couple of months, not wanting to put away

     my toys when I'm done with them.


Anyone else have New Year Resolutions that you intend to put off  get focused on as soon as possible??